Android 注解框架之 ButterKnife

ButterKnife(黄油刀) 是大名鼎鼎的 JakeWharton大神 所写的注解框架,目的是为了将我们从大量的 findViewById() 和 监听类中解脱出来,从而将更多的关注点在业务需求上。

前言

ButterKnife 是一个通过注解的方式将 变量方法 与 Android 视图绑定的框架。

使用 ButterKnife,我们能够:

  • 通过 @BindView 替代大量的 findViewById();
  • 在 list 和 array 中组织多个视图,并能够即时通过 actions, setters 或者 properties 来操作它们;
  • 通过 @OnClick 或别的注解方式来替代大量的监听内部类;
  • 通过资源注解替代资源查询。

下面一节我们具体细说。

如何在项目中使用?

本文只说在 Android Studio 中如何来使用(你要问我为什么不把 eclipse 中使用的方法也写上来,我只想说,大兄弟,弃了 eclipse 吧!)
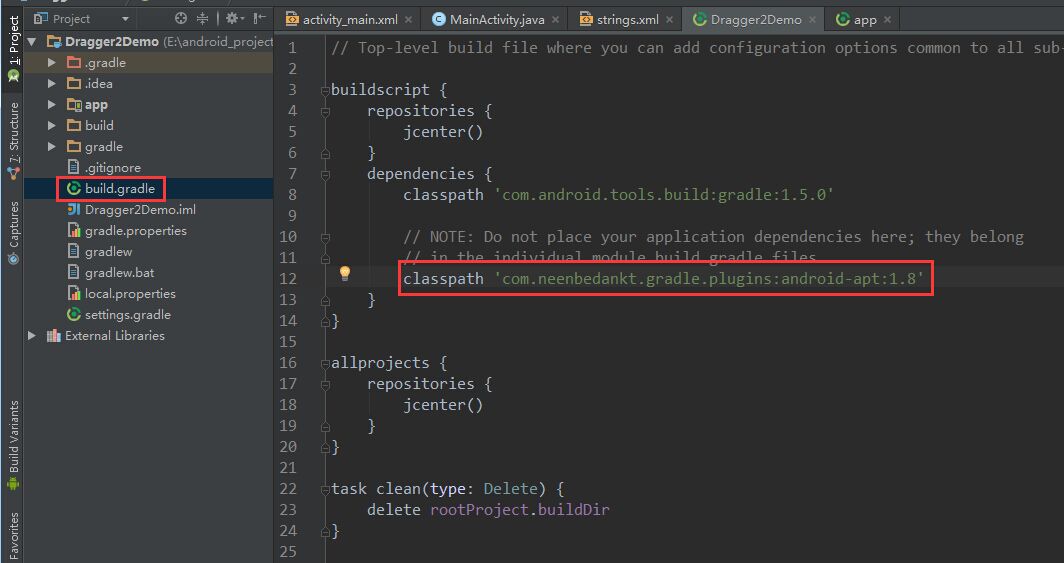
1.第一步:

项目根目录的 build.gradle 文件的 dependencies 中添加 classpath 'com.neenbedankt.gradle.plugins:android-apt:1.8',如图:
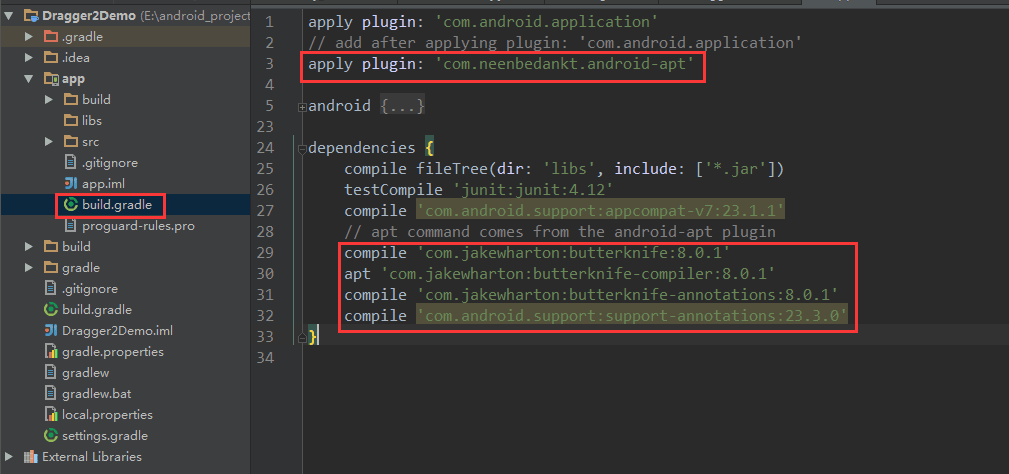
2.第二步:

app 目录下的 build.gradle 中配置 apply plugin: 'com.neenbedankt.android-apt'

dependencies 中配置:

1
2
3
4
compile 'com.jakewharton:butterknife:8.0.1'
apt 'com.jakewharton:butterknife-compiler:8.0.1'
compile 'com.jakewharton:butterknife-annotations:8.0.1'
compile 'com.android.support:support-annotations:23.3.0'

如图:

懒人必备:ButterKnifeZelezny 插件

功能介绍:帮助我们快速生成布局文件中的 view 对应的变量,省时省力。

点击 Setting -> Plugins -> Browse repositores;

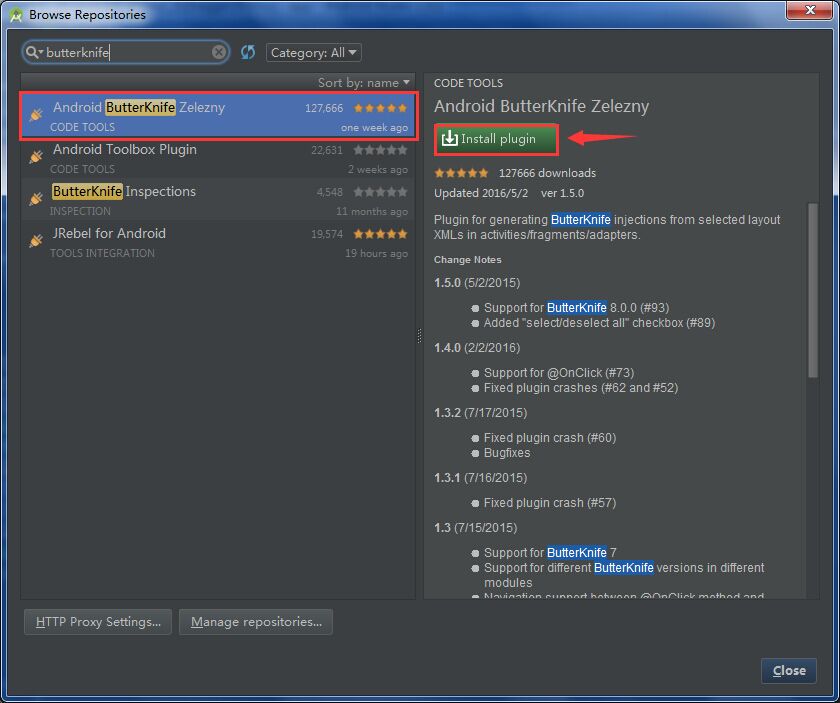
如上图所示,在搜索框中输入 butterknife,搜索列表中人气最高的就是 ButterKnifeZelezny 插件,点击右边的 安装 按钮,安装完成后,重启 Android studio 即可使用该插件了。

如何使用插件?

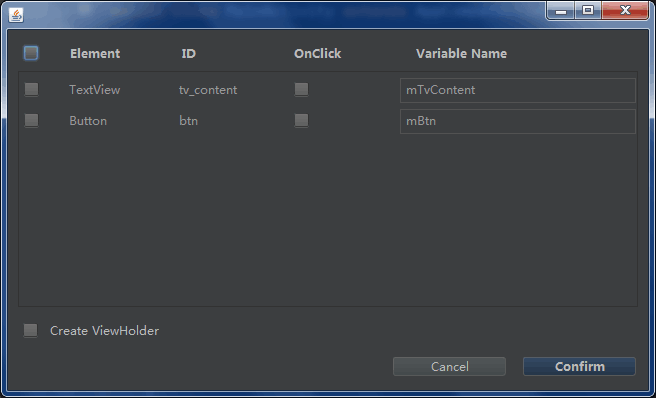
在需要自动生成绑定关系的 布局文件(如:R.layout.main) 上 右键, 点击 Generate -> Generate Butterknife Injections, 如下图:

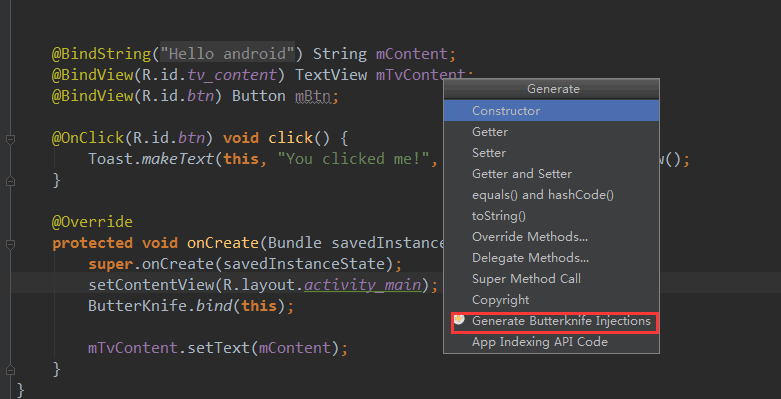
在窗口中选中,需要生成的变量,点击 confirm 即可:

详解

通过 @BindView, ButterKnife 能够自动的在相应的 layout 中查找到对应的 id,并与注解的变量绑定在一起。

1
2
3
4
5
6
7
8
9
10
11
12
class ExampleActivity extends Activity {
@BindView(R.id.title) TextView title;
@BindView(R.id.subtitle) TextView subtitle;
@BindView(R.id.footer) TextView footer;

@Override public void onCreate(Bundle savedInstanceState) {
super.onCreate(savedInstanceState);
setContentView(R.layout.simple_activity);
ButterKnife.bind(this);
// TODO Use fields...
}
}

ButterKnife 并不是运用反射的原理,视图与变量的绑定是在编译时动态生成代码,原理是通过 bind 委托,上面的注解会变成如下所示的代码:

1
2
3
4
5
public void bind(ExampleActivity activity) {
activity.subtitle = (android.widget.TextView) activity.findViewById(2130968578);
activity.footer = (android.widget.TextView) activity.findViewById(2130968579);
activity.title = (android.widget.TextView) activity.findViewById(2130968577);
}

Resource 绑定

通过预定义的注解与相应的字段绑定,如 @BindBool, @BindColor, @BindDimen, @BindDrawable, @BindInt, @BindString.

1
2
3
4
5
6
7
class ExampleActivity extends Activity {
@BindString(R.string.title) String title;
@BindDrawable(R.drawable.graphic) Drawable graphic;
@BindColor(R.color.red) int red; // int or ColorStateList field
@BindDimen(R.dimen.spacer) Float spacer; // int (for pixel size) or float (for exact value) field
// ...
}

非 Activity 如何绑定

你可以在提供的根视图的任何对象内执行绑定,例如下面的 fragment:

1
2
3
4
5
6
7
8
9
10
11
12
class ExampleActivity extends Activity {
public class FancyFragment extends Fragment {
@BindView(R.id.button1) Button button1;
@BindView(R.id.button2) Button button2;

@Override public View onCreateView(LayoutInflater inflater, ViewGroup container, Bundle savedInstanceState) {
View view = inflater.inflate(R.layout.fancy_fragment, container, false);
ButterKnife.bind(this, view);
// TODO Use fields...
return view;
}
}

而在 list adapter 中,你可以通过 ViewHolder 的方式:

1
2
3
4
5
6
7
8
9
10
11
12
13
14
15
16
17
18
19
20
21
22
23
24
25
26
public class MyAdapter extends BaseAdapter {
@Override public View getView(int position, View view, ViewGroup parent) {
ViewHolder holder;
if (view != null) {
holder = (ViewHolder) view.getTag();
} else {
view = inflater.inflate(R.layout.whatever, parent, false);
holder = new ViewHolder(view);
view.setTag(holder);
}

holder.name.setText("John Doe");
// etc...

return view;
}

static class ViewHolder {
@BindView(R.id.title) TextView name;
@BindView(R.id.job_title) TextView jobTitle;

public ViewHolder(View view) {
ButterKnife.bind(this, view);
}
}
}

View List

你可以将多个 view 放到一个 list 或者 数组 中。

1
2
@BindViews({ R.id.first_name, R.id.middle_name, R.id.last_name })
List<EditText> nameViews;

通过 apply() 能够让你即时改变所有 view 的行为。

1
2
ButterKnife.apply(nameViews, DISABLE);
ButterKnife.apply(nameViews, ENABLED, false);

ActionSetter 接口也同样能够允许你指定一些简单的行为。

1
2
3
4
5
6
7
8
9
10
static final ButterKnife.Action<View> DISABLE = new ButterKnife.Action<View>() {
@Override public void apply(View view, int index) {
view.setEnabled(false);
}
};
static final ButterKnife.Setter<View, Boolean> ENABLED = new ButterKnife.Setter<View, Boolean>() {
@Override public void set(View view, Boolean value, int index) {
view.setEnabled(value);
}
};

Android 中的一些属性也能够被使用在 apply() 方法中:

1
ButterKnife.apply(nameViews, View.ALPHA, 0.0f);

Listener 绑定

Listeners 同样能够动态的配置到某个方法上:

1
2
3
4
@OnClick(R.id.submit)
public void submit(View view) {
// TODO submit data to server...
}

所有监听方法中的参数都是可选择的:

1
2
3
4
@OnClick(R.id.submit)
public void submit() {
// TODO submit data to server...
}

你可以在方法中指定一个类型:

1
2
3
4
@OnClick(R.id.submit)
public void sayHi(Button button) {
button.setText("Hello!");
}

将多个 ID 指定为用同一个方法处理:

1
2
3
4
5
6
7
8
@OnClick({ R.id.door1, R.id.door2, R.id.door3 })
public void pickDoor(DoorView door) {
if (door.hasPrizeBehind()) {
Toast.makeText(this, "You win!", LENGTH_SHORT).show();
} else {
Toast.makeText(this, "Try again", LENGTH_SHORT).show();
}
}

自定义类型的 View 可以不用指定 ID 来绑定到 listener:

1
2
3
4
5
6
public class FancyButton extends Button {
@OnClick
public void onClick() {
// TODO do something!
}
}

绑定重置

相比较 Activity, Fragment 拥有不同的生命周期方法。当你在 onCreateView() 绑定了一个 fragment, 在 onDestroyView() 方法中将 view 设置为 null.

当你调用 bind() 方法时,ButterKnife 会返回一个 Unbinder 实例,你只需要调用其 unbind() 方法即可解绑。

1
2
3
4
5
6
7
8
9
10
11
12
13
14
15
16
17
public class FancyFragment extends Fragment {
@BindView(R.id.button1) Button button1;
@BindView(R.id.button2) Button button2;
private Unbinder unbinder;

@Override public View onCreateView(LayoutInflater inflater, ViewGroup container, Bundle savedInstanceState) {
View view = inflater.inflate(R.layout.fancy_fragment, container, false);
unbinder = ButterKnife.bind(this, view);
// TODO Use fields...
return view;
}

@Override public void onDestroyView() {
super.onDestroyView();
unbinder.unbind();
}
}

选择性绑定

默认情况下,@Bind监听绑定 都是需要的,但是当目标视图不存在时,会抛异常。

为了防止它出现,我们可以在绑定的变量上加上 @Nullable 注解或者在方法上加上 @Optional 注解。

注意:@Nullable 可以被使用在任何变量上,你只需导入 “supprot-annotations” 依赖即可。

1
2
3
4
5
6
7
@Nullable annotation from Android's "support-annotations" library.

@Nullable @BindView(R.id.might_not_be_there) TextView mightNotBeThere;

@Optional @OnClick(R.id.maybe_missing) void onMaybeMissingClicked() {
// TODO ...
}

多个方法监听

每个方法也可以绑定多个回调方法,这些方法有一个默认的回调,你也可以通过 callback 参数来指定替代的方法。

1
2
3
4
5
6
7
8
9
@OnItemSelected(R.id.list_view)
void onItemSelected(int position) {
// TODO ...
}

@OnItemSelected(value = R.id.maybe_missing, callback = NOTHING_SELECTED)
void onNothingSelected() {
// TODO ...
}

彩蛋

ButterKnife 还提供了 findById() 方法,通过它,你也能够在布局文件中找到相应的 view, Activity, Dialog
此方法通过泛型,来动态对返回值做转换。

1
2
3
4
View view = LayoutInflater.from(context).inflate(R.layout.thing, null);
TextView firstName = ButterKnife.findById(view, R.id.first_name);
TextView lastName = ButterKnife.findById(view, R.id.last_name);
ImageView photo = ButterKnife.findById(view, R.id.photo);

参考文献:

文章有帮助到您?不妨打赏博主一碗拉面或一杯咖啡的小费吧 :-D!