前言
什么是绑定服务?
绑定服务是指服务与其他绑定在一起。比如说,我们可以将服务绑定在 Activity 上,来发送请求,接受响应,甚至是执行进程间的通讯(IPC)。我们需要知道的是,绑定服务的生命周期通常与被绑定者的生命周期相同,不会无限期的运行在后台。
关于绑定服务
想要服务绑定于某个组件,你必须实现 onBind() 回调方法。该方法返回的 IBinder 对线定义了启动者与 Service 交互的接口。
通过调用 bindService() 来绑定服务。前提是,你必须提供 ServiceConnection 的实现,ServiceConnection 能够监控调用者与 Serviced 的链接。创建后,系统会调用 ServiceConnnection 接口中的 onServiceConnected() 回调,并先调用者传递 IBinder.这样,二者就可以通信了。
多个组件可以同时与 Service 绑定,不过,需要注意的是,只有在第一个组件绑定时,系统才会调用 onBind() 方法返回检索到的 IBinder.随后的绑定,系统将不在调用 onBind(),而是将同一个 IBinder 传递给绑定的组件。
何时销毁?
当最后一个与之绑定的组件解绑时,系统才会将 Service 销毁(排除 startService() 也启动了该服务)。
创建绑定服务
上面已经说到,绑定服务需要提供一个 IBinder,用来调用者和 Service 的交互,你可以通过以下三种方式来定义接口:
- 扩展 IBinder 类
如果这个服务只是提供给自身应用使用,并且与客户端运行在同一进程中,则应通过扩展 Binder 类,并从 onBind() 返回它的一个示例来创建接口。调用者在接受到 Binder 后,就可以通过它来访问 Binder 中的实现,甚至是 Service 中公有的方法。
也就是说,如果服务仅仅是自身应用的后台工作线程,则优先采用这种方法。
不使用这种方式创建接口的唯一原因是:被启动的服务需要提供给其他应用使用,或者不同进程使用。- Messenger
如果你需要让接口跨进程工作,那么你可以使用 Messenger 为服务创建接口。我们可以通过这种方式定义不同类型的 Message 对线的 Handler。这样我就可以和调用者同用一个 IBinder,调用者通过利用 Message 向服务发送命令。调用者也可以自定义 Message,以便服务回传消息。
这种方法是 进程间通信(IPC) 最简单的方法,Message 会在单一线程中创建所有的请求队列,这样就可以避免线程不安全的所带来的复杂性。
- 使用 AIDL
什么是 AIDL?
ALDL 是 Android 接口定义语言,用来将所有对象分解成原语的工作,操作系统可以识别这些原语并将它们编组进各进程中来执行进程间的通讯(IPC).而上面说过的 Messenger 的底层实际上就是通过 AIDL 来实现的。
如果你想要服务同时处理多个请求,则可直接使用 AIDL。前提是,你的服务必须具备多线程处理能力,同时采用线程安全的设计。
使用 AIDL,你需要创建一个定义编程接口的 .aidl 的文件。Android SDK 的工具利用该文件生成一个实现接口并处理 IPC 的抽象类,你可以在服务内对其扩展。
注意:基本上大部分应用都不会采用 AIDL 来创建绑定服务,因为它需要具备多线程的处理能力,这样导致实现功能的复杂性增加。所以说,并不适用于大多数应用。具体 AIDL 文档,请参阅 这里。
拓展 Binder 类
如果你的服务仅供本地使用,不需要跨进程工作,那你只要实现自有 Binder 类即可,通过此类来访问服务中的方法。
注意:此方法只有在客户端和服务在同一应用和进程中才有效。
具体步骤:
1.在你的服务中,创建一个满足下列任一要求的 Binder 示例:
- 包含调用者可调用的
public方法; - 返回当前 Service 示例,其中包含调用者可调用的
public方法; - 亦或是调用已有的 Binder 子类,其中包含调用者可调用的
public方法;
2.在 onBind() 回调方法中返回此 Binder 示例。
3.在调用者中,在 onServiceConnected() 回调方法中接口 Binder,并通过 bindService() 来绑定服务。
Note: 一直强调服务和调用者在同一应用内,是为了便于调用者转换返回的对象和正确的调用其 API。服务和调用者还必须在同一个进程内,因为此方法不支持跨进程。
示例代码:
1 | public class LocalService extends Service { |
上述代码中,LocalBinder 为调用者提供了一个 getService() 方法,以便调用者能够轻松获取 LocalService 的实例。同时,也能够调用服务内部的 public 方法。
再来看看调用者是如何启动 LocalService 的:
1 | public class BindingActivity extends Activity { |
上面代码贴出了调用者是如何通过 ServiceConnection 的实现和 onServiceConnected() 的回调来绑定到服务的。
注意:上例并没有显式取消与服务的绑定,但是我们在实际编码时都应在适当的时间(如 Activity 暂停时)取消绑定。
Messenger 如何使用?
无需通过 AIDL,我们通过 Messager 来实现进程间的通信。
如何使用?
- 服务中实现一个 Handler,来接收每个调用者中调用的回调;
- 利用
Handler来创建Messenger对象; - 通过
Messenger创建一个IBinder,服务通过onBind()来返回给调用者; - 调用者使用
IBinder将Messenger实例化,然后通过Messenger将Message对象发送给服务; - 服务在
handleMessage()方法中接收每个Message;
下面是示例代码:
1 | public class MessengerService extends Service { |
接下来,调用者只需根据服务返回的 IBinder 创建一个 Messenger,然后利用 send() 发送消息,下面是示例代码:
1 | public class ActivityMessenger extends Activity { |
上面的代码只是发消息让 Service 执行某段操作,并未有任何反馈,如果你需要让服务给出响应,你还需要在客户端中创建一个 Messenger。然后,但调用者接受到 onServiceConnected() 回调时,会向服务发送一条 Message,并在 send() 方法中附带一个包含调用者 Messenger 的 replyTo 参数。
绑定服务
调用者通过调用 bindService() 方法绑定到服务。系统随后会调用 onBind() 方法,该方法返回的 IBinder 用于两者之间的交互。
注意,绑定时异步的,服务不会立即返回 IBinder 对象。我们需要创建 ServiceConnection 示例,并将其传递给 bindService()。通过 ServiceConnection 中实现的回调方法来接收 IBinder。
注意:四大组件中,只有 Activity, Service, ContentProvider 才能绑定到服务,广播接收者是无法绑定到服务的。
绑定具体步骤:
1.实现 ServiceConnection:
你必须重写两个回调方法:
onServiceConnected(): 这个不用多说,放回 IBinder;onServiceDisconnected(): 当 Android 系统与服务的链接意外中断时(如服务奔溃或被终止时)调用此方法。取消绑定,系统是不会调用此方法的。
2.调用 bindService(),并传递 ServiceConnection。
3.当系统调用 onServiceConnected() 回调时,我们开始调用服务中的方法。
4.通过调用 unbindService() 来断开与服务的连接。
下面是一段 ServiceConnection 的使用示例代码:
1 | LocalService mService; |
通过 bindServcie() 来传递 ServiceConnection:
1 | Intent intent = new Intent(this, LocalService.class); |
再来说说 bindService() 方法中的参数:
- param 1: Intent - 可以是显式的,也可以是隐式的;
- param 2: ServiceConnection;
- param 3: 指定绑定选项的标志。通常都是
BIND_AUTO_CREATE,以便创建尚未激活的服务。其他可能的值为BIND_DEBUG_UNBIND和BIND_NOT_FOREGROUND,或 0(表示无)。
还有一些重要的事情
- 你应该捕获 DeadObjectException 异常,它在连接中断时引发。也是远程方法引发的唯一异常;
- 对象是进程计数的引用;
- 你应该在客户端生命周期的合理阶段来绑定和取消绑定,例如:
1.如果你只需在 Activity 可见时与服务交互,则应在 onStart() 期间绑定,在 onStop() 期间取消绑定。
2.如果你希望 Activity 在后台运行状态仍在工作,则可在 onCreate() 期间绑定,在 onDestory() 期间取消绑定。
注意:通常情况下,你不应该在Activity的onResume()和onPause()期间绑定和取消绑定,这样做性能会很差。另外,如果你的应用中多个Activity绑定了同一个Service,并且两个Activity之间发生了转换,系统可能会销毁服务并重建服务。
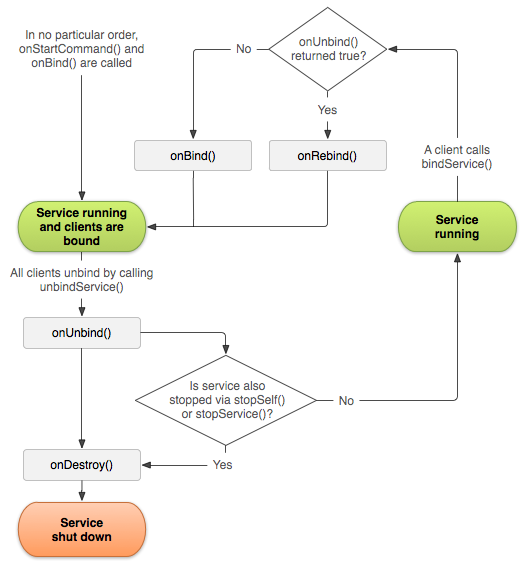
绑定服务的生命周期
当服务与所有的绑定时,系统会销毁该服务。换句话说,如果你创建的服务只是单纯的绑定服务,则无需对其生命周期进行管理,系统会根据该 Service 是否绑定到任何组件来代替你管理。
需要注意,如果你选择实现 onStartCommand() 回调方法,这时,你必须显式停止服务(通过 stopSelf() 或者 stopService())。
另外,如果你的服务已经启动并且绑定了,则当系统调用 onUnbind() 方法时,如果你想在调用者下一次绑定到该服务时,调用 onRebind() 方法,而不是 onBind() 调用,则可以选择返回 true。
下面是这种生命周期的逻辑:
本文学习自: